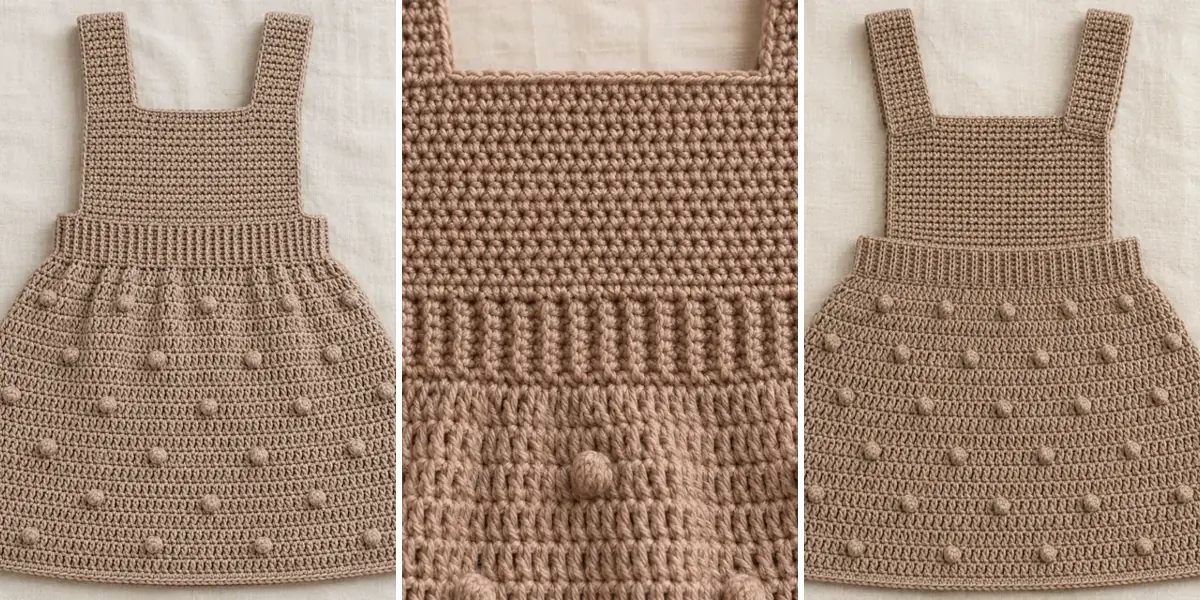

A ribbed waist, square bib and small raised bobbles give this crochet baby pinafore texture without making the straps bulky. The skirt grows down from the waistband, so you can stop at the length you need. The front and back bibs are worked upward, then joined by two wide, sewn shoulder straps.
Jump to the free pattern · Check the fit
Pattern status: This supplied pattern draft has not been test crocheted. The waistband circumference and bib width below are calculated targets, not measurements from a finished sample. Yarn quantity, fit, and finished dimensions still need practical testing. The AI-generated illustrations show the intended look and may differ from a crocheted sample.
Project at a glance
| Detail | Pattern information |
|---|---|
| Skill level | Intermediate |
| Terminology | US crochet terms |
| Sizing | One size with a target relaxed waistband circumference of 48 cm (19 in). Choose by measurements. |
| Construction | Ribbed waistband, joined skirt rounds, flat front and back bibs, two sewn shoulder straps |
Materials
- Soft DK-weight yarn, such as a cotton blend. Use a single color to highlight the texture. Yardage is unverified, so plan to have spare yarn from the same dye lot.
- 3.5 mm crochet hook as a starting point, plus another size if needed for gauge.
- Tapestry needle, scissors, stitch markers and a flexible measuring tape.
Gauge and fit
For the ribbing, aim for 20 rows across 10 cm (4 in) measured in the direction the band grows. At that gauge, 96 rows make a band about 48 cm (19 in) around before allowing for any change at the seam. Measure the completed band relaxed and comfortably stretched; the seam and fabric tension can affect the result. For the bib, aim for roughly 20 sc across 10 cm, giving a 26-stitch bib about 13 cm (5 in) wide. Wash and dry your swatches as you would the garment before measuring. For the skirt, use a swatch to check the drape and work to the measured length. Bib row gauge and strap length are not specified, so their finished heights cannot be predicted from the row counts alone. Record your own washed row gauge and compare the bib after 12 rows with your reference garment.
This is a pull-on design. Compare the band, including its comfortable stretch, with the waist and the widest point it must pass over when dressing. Before sewing the straps permanently, compare the neck opening, bib height and arm openings with a well-fitting pull-on garment. If the waistband size needs to change, the fixed stitch counts below need to be reworked. Straps and skirt length can be adjusted without changing those counts.
Abbreviations and bobble stitch
Ch = chain, sc = single crochet, dc = double crochet, sl st = slip stitch, BLO = back loop only, st = stitch, rnd = round, RS = right side, WS = wrong side. Turning chains do not count as stitches. Start each skirt round in the first stitch at the join, then join to the first actual stitch. After a turn, work into the first available actual stitch in the new direction. Do not work into the slip-stitch join or turning chain. Use a marker to identify the first stitch and recount after every increase or bobble round.
Four-dc bobble: In the next stitch, work four partial dc into the same stitch. For each partial dc, yarn over, insert the hook, pull up a loop, yarn over and pull through two loops. With five loops on the hook, yarn over and pull through all five. The bobble counts as one stitch. Work it from the WS and push it toward the RS before continuing.
Free crochet baby pinafore pattern
1. Ribbed waistband
- Ch 8. Sc in the second ch from the hook and in each remaining chain. [7 sc]
- Rows 2–96: Ch 1, turn and sc BLO across. [7 sc per row]
- Bring the short ends together without twisting the band. With a yarn needle, sew the seven stitches of the last row to the seven foundation stitches. Keep the seam flexible. Mark the seam as center back and check the band against your measurements.

2. Bobble skirt
Work around the lower long edge of the waistband, leaving the opposite edge free for the bibs, with the seam at center back. The beginning of each round stays near that seam.
- Rnd 1 (RS): Join yarn at the waistband seam. Ch 1 and work one sc into each row end. Join with a sl st. [96 sc]
- Rnd 2 (RS): Ch 2. Work (dc in next 7 sts, 2 dc in next st) 12 times. Join. [108 dc]
- Rnd 3 (RS): Ch 2. Work (dc in next 8 sts, 2 dc in next st) 12 times. Join. [120 dc]
- Rnds 4–5 (RS): Ch 2 and dc in every st. Join. [120 dc per rnd]
- Rnd 6 (WS): Turn so the WS faces you. Ch 1 and work (sc in next 9 sts, bobble in next st) 12 times. Join. [108 sc and 12 bobbles]
- Rnds 7–9 (RS): Turn back to the RS at the start of rnd 7. Ch 2 and dc in every st, working one dc into the top of each bobble on rnd 7. Join each round. [120 dc per rnd]
- Repeat the sequence from rnds 6–9 until the skirt is just short of your desired length. End on an RS round. To adjust length by a smaller amount, add one or two plain RS dc rounds.
- Hem (RS): Ch 1, sc around and join. [120 sc] Fasten off and weave in the end.

3. Front and back bibs
- With the skirt pointing down, mark 26 consecutive row ends centered opposite the waistband seam for the front bib. Mark 26 centered over the seam for the back bib. Center each 26-row-end section on the relevant center point, with 13 row ends on either side. Check for 22 free row ends between the bibs on each side. [26 + 22 + 26 + 22 = 96]
- For each bib, join yarn with the RS facing at the end of its marked section where you can crochet across all 26 marked row ends. Ch 1 and sc evenly across. [26 sc]
- Rows 2–12: Ch 1, turn and sc across. [26 sc per row] Fasten off on the back bib. Check the bib height against your reference garment before working the straps.
4. Shoulder straps
- With the RS of the front bib facing, mark the outermost 7 stitches at each top corner. Leave the center 12 stitches free for the neckline.
- For each strap, join at the end of its marked section where you can work across those 7 stitches. Ch 1 and sc across. [7 sc]
- Ch 1, turn and sc across each row until the strap reaches the matching corner of the back bib. Use the same number of rows for both straps. Leave a long sewing tail on each.
- Lay the dress flat and pin the straps to the outer 7 stitches of the back bib without twisting them. Check the openings against your reference garment. Sew each strap securely across all seven stitches and weave in both ends. Remove every pin and marker before dressing a child. Check that the garment pulls on and off comfortably; do not force a tight waistband or neck opening.

Finishing and troubleshooting
- The waistband seam feels tighter than the ribbing. Redo it with relaxed sewing tension and test the stretch before starting the skirt.
- The skirt ruffles at the waist. Recount the pickup round and confirm it contains one sc per row end. Rest the piece flat after the first increase round before judging the flare.
- A bobble sinks to the inside. Push it through to the RS after closing the four partial dc. Keep the following sc snug enough to hold the bobble in place.
- The straps lean toward the neckline. Align each front strap with the corresponding outer seven stitches of the back bib and check that the side openings match.
Variations, care and FAQs
Can I skip the bobbles?
Yes. Work a plain RS dc round in place of each bobble round and skip the turns. Keep 120 stitches per round.
How do I make the skirt longer?
Add plain dc rounds or another four-round texture repeat before the hem. Measure the skirt from the lower edge of the waistband, and record the number of rounds if you plan to make a second dress.
How should I wash and reshape it?
Follow the yarn label. After washing, reshape the waistband and straps without stretching them and dry the pinafore flat. If you use a different fiber, check your washed swatch for any change in length or width before you start.